
S.M.A.R.T. diagnostics HDD and SSD: smartphone, GSmartControl and safe data saving
What's S.M.A.R.T.? - and what's not
S.M.A.R.T. (Self-Monitoring, Analysis and Reporting Technology) is a set of internal statistics, logs, health indicators and self-tests in disk. It's not a universal "life-cycle percentage." Manufacturers may interpret the same attributes numbers differently and some values are vendor- specific.
The most important thing is to distinguish normalized value, Three and raw value. The standard value is the manufacturer's scale index; the third is the SMART fail-safe boundary. Raw value is usually a real counter or bit field - but for some manufacturers (typically part of Seagate attributes) it is not appropriate to read a giant raw number as a simple number of errors.
Safe diagnostic workflow
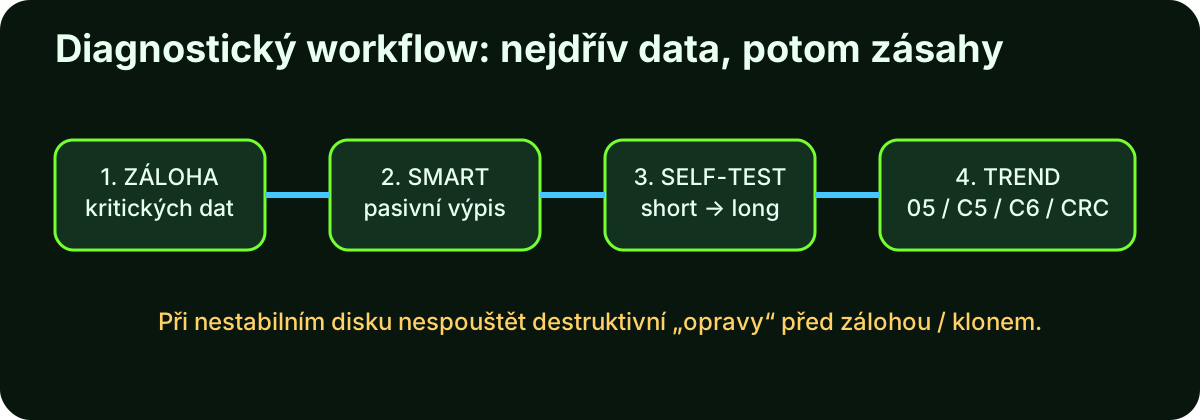
- Back up / clone important data. If the disk clicks, disappears from the system, has dozens of sectors or the number of errors is rising sharply, reduce unnecessary testing.
- Get a passive SMART statement. 'smartphone -x 'is more appropriate than a headless run of a long test.
- Check Error Log and Self-Test Log. Search LBA errors, command timeouts and failed tests.
- Short test is a quick check of electronics and internal mechanisms.
- Long / Extended Test going through a substantially larger part of the media; on large HDD can take many hours.
- Follow the trend. The one-off figure is less informative than 05 / C5 / C6 growth or repeated errors.
Key ATA SMART attributes HDD
| ID | Name | What does it mean? | How to react |
|---|---|---|---|
| 05 | Reallocated Sector Count | Sectors replaced by reserve. The non-zero value alone may not mean immediate death, but growth is a warning. | Backup; follow trend. When growing, remove the disk from the critical role. |
| C5 / 197 | Current Pending Sector | Unstable sectors waiting for re-reading / transcription and remapaging decisions. | Priority deposit / clone. Do not bother with repeated tests on unstable disk. |
| C6 / 198 | Offline Uncorrectable | Sectors that couldn't be repaired in offline control. | Serious warning; check long test, logs and data status. |
| BB / 187 | Reported Uncorrectable Errors | Irreparable errors transmitted to the host. | Check cabling / controller and medium; change disk repetition. |
| C7 / 199 | UltraDMA CRC Error Count | Transferring errors over the SATA interface. | Often cable, connector, power supply or controller - not the surface of the stove. |
| 0A / 10 | Spin Retry Count | Repeated attempts to spin the engine. | Mechanics / power supply; for growth, resolve urgently. |
| 09 | Power- On Hours | Operating hours. | The context of age, not a separate reason for exchange. |
| C2 / 194 | Temperature | Disk temperature. | Search for long-term high temperatures and bad cooling. |
| 16 / 22 | Helium Level / Condition | For selected helium HDD indication of the hermetic system state. | The meaning is vendor- specific; interpret through smartphone tools drivedb. |
There is no universal rule "raw must always be 0." This applies to some counters (e.g. the pendor / uncorrectable is ideally 0), but not for all vendor-specific attributes. At Seagate, Raw Read Error Rate and Seek Error Rate are a typical example of values that must not be read without the knowledge of format.
NVMe: different model of health information
NVMe SSD does not have the same table of ATA attributes as SATA HDD. 'smartphone -x / dev / nvme0 'or corresponding device displays NVMe SMART / Health log: Critical Warning, Temperature, Avable Save, Percentage Used, Data Units Read / Written, Power Cycles, Power On Hours, Unsafe Shutdowns and Media / Data Integrity Errors.
For SSD it has a special meaning Percentage Used and media errors. The 100% value is not necessarily an immediate failure; it is the achievement of the manufacturer-defined border endurance. The backup remains necessary regardless of the indicator.
Windows 10 / 11: Install Smartmontools and GSmartControl
Variant A - Official installers
Download only from the official project pages. GSmartControl explicitly warns about domain gsmartcontrol.com; official website is gsmartcontrol.shaduri.dev.
The current official GSmartControl page presents for Windows 7 + version 2.0.2 as 64bit installer i portal ZIP. Smartmontools has a branch 7.5 and its disk database is kept up to date.
Variant B - Winget
winget search smartmontools
winget install smartmontools.smartmontools

winget search gsmartcontrol
winget install gsmartcontrol
Since package names can be changed in the catalogue, it is safe to use 'winget search' first and check Publisher / Source.
Basic commands
smartctl --scan
smartctl --scan-open
smartctl -i /dev/sda
smartctl -H /dev/sda
smartctl -A /dev/sda
smartctl -a /dev/sda
smartctl -x /dev/sda
In Windows, physical drives can be displayed as' Deg1 ',' / dev / sda 'according to the build and interface. Don't rely on the example - always start 'smartphone --scan-open'.
Ubuntu / Debian: installation and use
sudo apt update
sudo apt install smartmontools gsmartcontrol -y

sudo smartctl --scan-open
sudo smartctl -x /dev/sda
Run GSmartControl via menu item or mechanism that distributes for increased permissions. The official documentation provides the 'gsmartphone control -root' command for Linux / Unix if available in the package.
Automatic monitoring via smartphone
Smartmontools package also contains demon smartd. It is advisable to set up regular checks and notifications on the server or NAS. The specific configuration depends on the distribution and email / notification infrastructure; before activation, check that the smartphone actually sees the physical device behind the controller.
Self-tests: when Short and when Long
Short
sudo smartctl -t short /dev/sdaThe disk shall notify the estimated time of completion. Then:
sudo smartctl -l selftest /dev/sda
sudo smartctl -x /dev/sda
Long / Extended
sudo smartctl -t long /dev/sdaExtended self-test can take many hours for 20TB + HDD. It runs internally in the hard drive firmware and the common I / O can slow it down. Always check the self-test log and Error Log after completion.
USB boxes, converters and RAID: why SMART sometimes "does not see disk"
SMART commands must pass from the operating system through the controller to the physical disk. Some USB-SATA bridge chips can SAT passtrough, others only partially and some SMART block. Similarly, a hardware RAID can hide physical drives behind a logical volume.
smartctl --scan-open

# příklady typů zařízení – použijte jen pokud odpovídají vašemu bridge/řadiči
smartctl -x -d sat /dev/sdb
smartctl -x -d scsi /dev/sdb
GSmartControl supports SATA / PATA / NVMe, various USB bridge and some RAID controllers, but its options are limited by what smartmontools and hardware themselves can do.
Practical decision table
| Situation | Risk | Recommended step |
|---|---|---|
| C5 / C6 = 0, self-test without error, no symptoms | Low, not zero | Continue operation + backup + periodic monitoring. |
| Several reallocated sectors, long-term stable | Increased | Backup, follow trend; for critical data, preventive exchange. |
| C5 or C6 is growing | High | Instant deposit / clone, limit entry, plan exchange. |
| CRC errors grow, surface attributes clean | Medium | Check SATA cable, connector, power supply, controller. |
| Click, repeated spin-up, dissipate from BIOS / OS | Critical | Disable, not perform long tests; for valuable data professional recovery. |
| SMART PASSED, but system reports I / O errors | Unclear to high | Read Error Log, kernel / Event Viewer, cabling, controller and filesystem separately. |
Sector clone: GNU ddrescue - we save data first, not filesystem
When a disk has physical reading errors, repeatedly vanishes from the system or sharply increases C5 / C6, it is not ideal to start with a tool CHKDSK, fsck, "repair" functions or an endless SMART long test. All these operations can force a dying mechanic to read the problem spots over and over again. The first phase is to get as many readable sectors as possible for healthy media with as few unnecessary attempts.
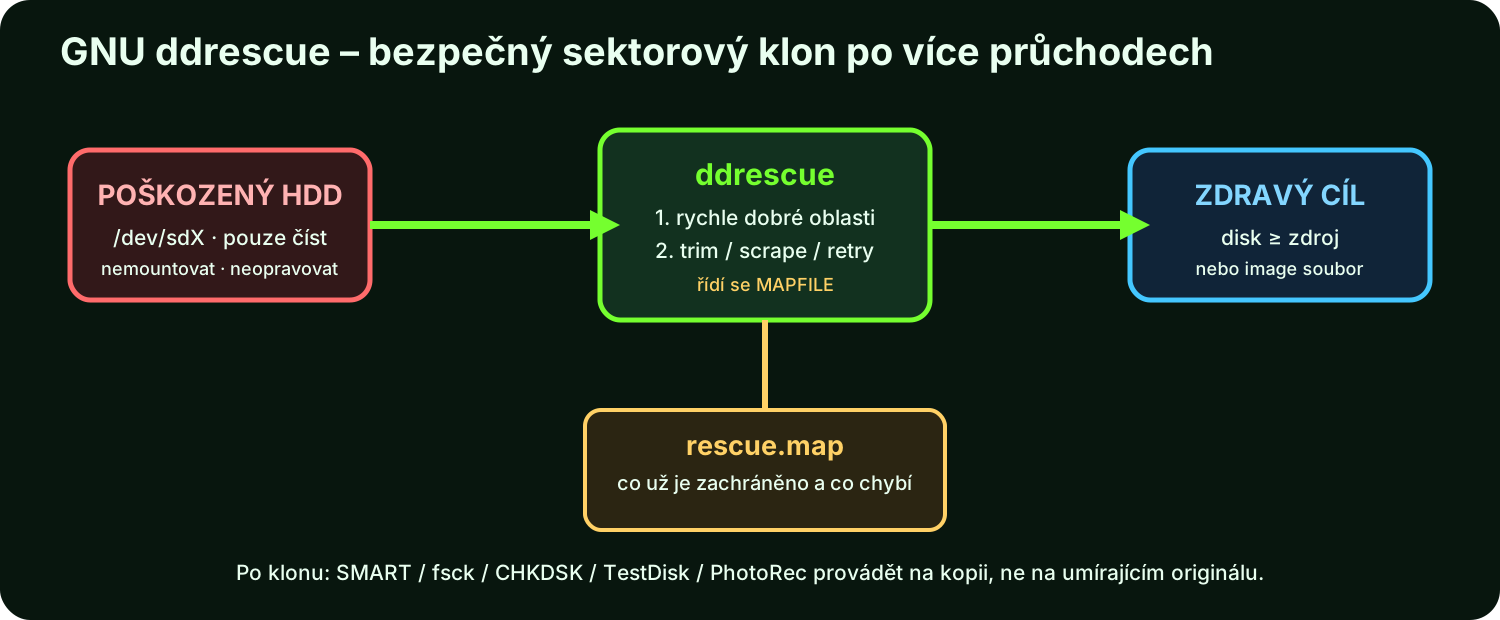
That's what they're for. GNU ddrescue. It's not the same as a classic unix. dd or old program dd_rescue. GNU ddrescue is a specialized tool for data recovery. Read the good areas first, avoid the defective places on the first pass and leave them to the later stages.
Why isn't it common? dd ideal
dd is an excellent general copying tool, but for damaged media its basic algorithm is not designed as recovery strategy. It can stay on defective areas for a long time or require manual setting of parameters and offsets. ddrescue, on the other hand, keeps an overview of the state of the media and automatically selects the copying phase to maximize the amount of data rapidly obtained.
Mappile is the most important set of the entire rescue
The third parameter of the ddrescue command is mappile - a small text file that records which parts of the source are already safely saved, which have not yet been tested and where the problem areas remain. Thanks to this, the operation can be interrupted at any time and later continued without re-reading the finished blocks. The official GNU manual directly refers to mappile as a key part of ddrescue efficiency.
Save the mappile to a third healthy medium or to a reliable filesystem. Don't put it on the damaged source. And if you clone the disk → drive, don't put it on the target disk that ddrescue overwrites.
When DIY rescue rather stop
- The disc is mechanically clicking, scratching or repeatedly spinning,
- fell, flooded, burned, or physically open,
- data are irreplaceable and there is no second copy,
- Disconnect after a few seconds and make each switch-on worse,
- You suspect a damaged head or a surface of the stove.
In such cases, any additional spin-up may reduce the chance of a professional laboratory. ddrescue is a very good tool, but it cannot repair mechanically damaged head or read a disk that is not identified as a block device at all.
Download - where GNU ddrescue safely obtain
Current upstream GNU ddrescue is 1.30 (January 2026). Ubuntu 26.04 LTS offers package gddrescue 1.30; Ubuntu 24.04 LTS is older 1.27. This is not a name error: the package is called in Debian / Ubuntu gddrescuebut the installed command is ddrescue.
For a Windows computer, the safest practical procedure is often not clone the failing system disk from running WindowsBut boot a specialized Linux. SystemRescue 13.02 (2026-08-01) is approximately 1,3 GB ISO and contains recovery tools. ISO can be written to USB and the system can be run outside Windows so that the damaged disk does not need to be connected read / write as a system volume.
Installation in Ubuntu / Debian
sudo apt update
sudo apt install gddrescue

# volitelné grafické zobrazení mapfile
sudo apt install ddrescueview
First, identify the drives according to model and serial number
The most dangerous error in ddrescue is not a bad parameter of retras. It's replacement of resources and objectives. The target block drive will be overwritten. Therefore, do not follow the name /dev/sdabecause the order can change after the reboot.
lsblk -o NAME,SIZE,MODEL,SERIAL,TRAN,FSTYPE,MOUNTPOINTS
sudo smartctl --scan-open
sudo smartctl -i /dev/sdX
Check the source and target according to capacity, model and serial number. If the damaged disk is connected via the problematic USB-SATA bridge, the SATA / SAS direct connection is more suitable when saving more seriously, if it is safely possible.
Do not use source - nor "just to be sure"
The official GNU manual recommends the saved disk or partition not to have connected at all, if possible even read- only. There must be no read / write attached. Similarly, the correction of filesystem to the I / O media should not be triggered before the clone.
# zkontrolujte, zda zdroj není připojen
lsblk -f

# případně odpojte jeho oddíly
sudo umount /dev/sdX1
sudo umount /dev/sdX2
Variant A - the whole damaged disk directly on the new disk
The target disk must be at least equal in number of sectors. Nominally "same 2 TB" may not always have exactly the same number of LBA, so it is safer to use a slightly larger disk.
# 1. průchod: co nejrychleji vezmi snadno čitelná data, bez scraping fáze
sudo ddrescue -f -n /dev/sdX /dev/sdY /mnt/healthy/rescue.map

# 2. průchod: direct I/O + několik pokusů nad zbývajícími problematickými místy
sudo ddrescue -d -f -r3 /dev/sdX /dev/sdY /mnt/healthy/rescue.map
This two-pass pattern corresponds to the official GNU examples: the first pass with -n spends a lot of time scraping, the second one uses -d for direct disk access; and -r3 for three retras above remaining errors.
What exactly do switches mean
| Choice | Meaning |
|---|---|
-f | Force - allows writing directly to the block device. It's a safety safety policy, not a "faster mode." |
-n | The-scrape - omits the time-expensive scraping phase. In the first pass you get the maximum of good data with less suffering of defective places. |
-d | Direct disk access - bypasses part of the cache layer OS; it is useful in conquest of problematic sectors. |
-r3 | Retry bad sectors three times. The higher number is not automatically better; for a mechanically dying medium it can only increase wear and time |
-R | Reverse - copying in reverse direction. It is suitable in some freezing scenarios or in the rigging of the edges of the problematic area. |
--ask | Before starting, it displays the device's identity and requests confirmation. For saving the disk → the disk is a very reasonable additional protection. |
Variant B - damaged disk into image file
Often it is safer to create an image file on a large healthy disk. The advantage is that you do not destroy the existing division of the target disk and the image can be easily copied, snapshot or connected to read- only.
# zdravý filesystem musí mít dost volného místa na celý zdroj
sudo ddrescue -n /dev/sdX /mnt/recovery/failing-disk.img /mnt/recovery/failing-disk.map
sudo ddrescue -d -r3 /dev/sdX /mnt/recovery/failing-disk.img /mnt/recovery/failing-disk.map
For 8TB power supply, you need about 8 TB free space plus reserve for full raw image. The target media filesystem must support such a large file - FAT32 is obviously inappropriate.
Why is a clone of disk often better than copying files
Filesystem copying tries to understand directories and files and can repeatedly run into damaged metadata. The sector clone first saves the blocks no matter what's in them. This can also save damaged filesystem, from which you can later reconstruct folders, partitions table or files.
After clone you can experiment with fsck, CHKDSK, TestDisk or PhotoRec without further loading the original. Ideal is to create one more working copy of the image and more destructive repairs to try on it.
How to read a common state statement ddrescue
| Item | Meaning |
|---|---|
rescued | How many data have been successfully read and written into the finish line. |
pct rescued | Percentage of the rescue domain that's done. |
read errors | The number of reading operations that ended up with a mistake - it is not the same as the number of definitely lost sectors. |
bad-sector | The volume of the area designated as definitely the wrong sector in the current state of the mappile. |
bad areas | Number of continuous bad areas. |
ipos / opos | Current entry and exit positions. |
current rate / average rate | Current and average speed. A severe drop may indicate a problematic area or a reset device. |
Disk freezes or disappears from / dev
If the disk stops responding, ddrescue can't read something that kernel can't see anymore. In such a situation, the device is often safely restarted / power-cycle and the same command is restarted. same mappile. The finished parts don't read again.
GNU ddrescue 1.30 improved automatic behaviour with dead-head drives so that large problematic areas jump faster and do not cause millions of useless read error. This is a practical reason to prefer the current version if the live system offers it.
Graphic tracking: ddrescuevide
ddrescuevide Loads maps and displays a colour map of blocks similar to old defragmentation programs. It is useful for quick understanding whether damage concentrated in one place, dispersed or, for example, periodic - which may be consistent with the problems of a specific head / surface.
ddrescueview /mnt/healthy/rescue.mapThe Ubuntu 26.04 offers ddrescuevide 0.4.5. There is also a Windows build 0.4.5 on SourceForge, but cloning the defective physical disk itself is more practical to perform from Linux live environment.
After clone: we work with copy
If you cloned the disk → disk, disconnect the original and do the next work only with the goal. If you have an image:
# zobrazí partition table image
sudo fdisk -l failing-disk.img

# připojení image pouze pro čtení přes loop device
sudo losetup --find --show --partscan --read-only failing-disk.img
lsblk

# poté lze konkrétní oddíl připojit RO, např.
sudo mount -o ro /dev/loop0p1 /mnt/recovered
Only over the copy can a filesystem repair be considered. For really important data it is preferable to first pull readable files and repair operations to try out a second working copy.
BitLocker, LUKS and other encryption
The sector clone copies encrypted data. ddrescue may not know the password or key. This is an advantage: you can save the physical structure of the disk and decrypt up to a copy. But if key encryption metadata are damaged or you don't have a recovery key, the raw clone itself won't get past the encryption.
What ddrescue can't do
- not repair the damaged head, engine or preamp;
- read a disk that does not report as a device at all,
- not automatically restore the directory structure from a heavily destroyed filesystem,
- does not replace backup - clone also copies logical damage and malware,
- is not a reason to unnecessarily torture a mechanically dying disk with endless retras.
Practical continuity: DiskCloner and DiskAdmin
Diagnostics theory, S.M.A.R.T. and sectoral rescue naturally follows the two custom utilities available in the BazookaWEB portfolio. It is not a replacement of GNU ddrescue for a mechanically failing disk; it is a division of work according to the state of the media and the purpose of the operation.
Windows tool for cloning and working with disk images. According to the current source package, RAW supports cloning through dd (disk ↔ disk and disk ↔ image), SMART copy of NTFS volumes via Robocop with reconstruction partitions, saving and restoring image, writing boot media and SD / IMG and verifying writing using SHA-256 or quick sample verification.
Typical role: migration of a healthy disk, creating an accurate RAW copy, backup to image, image recovery, verification of result and preparation of boot media.
Separate Windows GUI for managing physical disks, partitions and Storage Spaces via PowerShell and DiskPart. It can review disks and partitions, delete / clean / clean all, create a new partition, formatting, assign unit letters, manage Storage Spaces and export report to TXT / HTML.
Typical role: preparing a healthy target disk before cloning, checking the partition after recovery, assigning unit letters and managing storage.
Which tool when to use?
| Situation | Recommended tool | Why? |
|---|---|---|
| Healthy HDD / SSD → new disk | DiskCloner | RAW disk → disk or SMART NTFS copy, subsequent verification. |
| Healthy Disk → File Image | DiskCloner | Disk → image; the image can be archived and later restored. |
| Image → physical disk / SD / USB | DiskCloner | Restore image and raw writing on the target medium. |
| Disc has read errors, C5 / C6, disconnecting | GNU ddrescue | Mappile and multipass recovery strategies are designed directly for defective media. |
| After ddrescue you need to create a partition / format healthy target | DiskAdmin | Clear management of the part table, formatting and drive-letter. |
| You need to check Storage Spaces or export the disk status | DiskAdmin | Dedicted administration via PowerShell / DiskPart + TXT / HTML report. |
dd. It's appropriate and straightforward on a healthy medium. But for a physically degrading disk, first, prefer GNU ddrescue, because its mappile and algorithm "good area first, problematic later" minimizes unnecessary repeated reading of damaged sites.Recommended workflow for defective disk
1. SMART / symptomy → potvrdit podezření na fyzický problém
2. GNU ddrescue → sektorová kopie na zdravý disk nebo do image
3. originál odpojit a dál s ním nepracovat
4. diagnostika filesystemu / TestDisk / PhotoRec → pouze nad kopií
5. DiskAdmin → správa cílového disku, partitions, formátování, drive letter
6. DiskCloner → vytvoření další záložní image nebo ověřená migrace zdravé kopie
Recommended workflow for healthy disk
1. DiskAdmin → ověřit zdroj/cíl, velikost, partition style a stav cíle
2. DiskCloner → RAW clone / SMART clone / Create Image
3. DiskCloner → SHA-256 nebo rychlá vzorková verifikace
4. DiskAdmin → kontrola oddílů, písmen jednotek a případné dokončení správy
Connection with the portfolio: DiskCloner and DiskAdmin are already described in the BazookaWEB application section. In this article they work as a practical continuation of general instruction: the reader first understands HDD, S.M.A.R.T. and recovery principles and then can move on to tools for real work with drives.
Safe links to download and documentation
Security: GSmartControl on its official website warns that gsmartcontrol.com is a phishing website. Use domain gsmartcontrol.shaduri.dev or the official project repository.